How to Set Up Coating for Paper Cup Stock on a Single Side Laminator
You’ve got a roll of paper cup stock sitting on the unwind stand, and you need to coat one side with a clean, consistent PE layer. Sounds simple. But if the temperature is off by ten degrees, the resin won’t bond properly. If the nip pressure is too high, you’ll crush the paper fibers. Too low, and the coating delaminates the moment someone pours hot coffee into the cup.
Setting up an Extrusion Coating Lamination Machine for paper cup stock is different from running flexible films or aluminum foil. The substrate is porous, heat-sensitive, and thickness varies from 200 to 400 gsm depending on whether you’re making a single-wall or double-wall cup. This article walks you through the exact parameters you’ll need—temperature targets, pressure ranges, line speed sweet spots, and a quick pre-run checklist. No filler, just the settings that work.
Paper Cup Board Isn’t Like Film or Foil — Here’s Why
Paperboard for cups has three quirks that affect how you run the line:
-
Porosity. Uncoated cup stock absorbs heat from the molten resin faster than film or foil. If your extrudate temperature is too high, you’ll scorch the paper. Too low, the resin cools before it wets out.
-
Heat sensitivity. Paper burns at around 230°C. LDPE melts at 105–115°C but needs to be extruded at 280–320°C for proper flow through the die. That means you’ve got a hot curtain of plastic landing on a substrate that can’t take that heat for long. The solution? A properly chilled cooling roll and the right nip pressure to pull heat away instantly.
-
Moisture content. Cup stock typically has 5–8% moisture. If your cooling roll temperature is too low, condensation forms on the roll surface and transfers to the paper. You’ll see white spots or delamination in the finished cup.
If you’re new to running cup stock, start with a slow setup. Get the temperature and pressure dialed in on a short test roll before committing to a full production run.
Temperature Zones That Actually Work for LDPE on Paper
PE resin doesn’t flow evenly until it reaches the right melt temperature. For paper cup stock, you’re almost always using LDPE with a melt flow index between 7 and 12. Here’s what the zones should look like on a typical setup:
| Zone | Target Temperature | Why It Matters |
|---|---|---|
| Feeding zone (barrel rear) | 180–200°C | Gradually melts the pellets without degrading them |
| Compression zone (barrel middle) | 240–270°C | Increases shear and builds pressure |
| Metering zone (barrel front) | 280–300°C | Homogenizes the melt before the die |
| Die body (all zones) | 290–310°C | Maintains uniform viscosity across the width |
| Die lip (exit) | 295–305°C | Prevents “die drool” and ensures clean curtain |
A few practical notes from the floor: If you see streaks or uneven coating across the web, check your die lip bolts first. A difference of just 0.05mm in lip gap creates noticeable thickness variation. Most operators set the die gap slightly wider at the edges—about 0.02mm—to compensate for the natural “neck-in” effect where the molten curtain pulls inward as it falls.
Also, don’t skip the purging step between jobs. Switch resin grades without a proper purge, and you’ll get carbonized particles in the melt. Those black specks end up embedded in the coating, and customers reject rolls that have visible contamination in the finished cups.
Where the Rubber Meets the Paper — Nip and Cooling Roll Settings
The extruder melts the resin, and the die shapes it into a curtain. But the bond between PE and paper happens at the nip — the point where the molten plastic, the paper web, and the cooling roll all come together.
For paper cup stock, you’re looking at:
-
Nip pressure: 40–60 N/mm of roll width. Lighter paper (200–250 gsm) needs lower pressure to avoid crushing. Heavier cup stock (350–400 gsm) can handle higher pressure, which improves adhesion.
-
Cooling roll surface temperature: 15–25°C. Too cold, and you get condensation on the roll (white spots on the coating). Too warm, and the PE doesn’t solidify fast enough—it sticks to the roll or transfers poorly.
-
Rubber roll hardness: 85–90 Shore A. Softer rolls conform better to uneven paper surfaces but wear faster. Harder rolls give more uniform pressure distribution but require better web flatness.
Here’s a tip from production managers I’ve spoken with: monitor the cooling roll temperature continuously, not just at startup. Water temperature in the chiller can drift during a long run if the cooling capacity isn’t matched to line speed. A rise of even 5°C in roll temperature changes the crystallization rate of the PE, which directly affects heat seal strength in the finished cup.
How Fast Can You Go Without Ruining the Coating?
You can run paper cup stock at speeds between 150 and 250 m/min on most modern lines. The limiting factor isn’t the machine—it’s how fast the cooling roll can pull heat out of the molten PE.
| Coating Weight (gsm) | Recommended Speed (m/min) | Notes |
|---|---|---|
| 12–15 (light barrier) | 220–250 | Works well for cold cups, short-term use |
| 18–22 (standard) | 180–220 | Standard for hot beverage cups |
| 25–30 (heavy duty) | 150–180 | For double-wall cups, extended hot liquid contact |
| >30 | 120–150 | Rare—usually indicates design issue |
If you’re running bio-based resins like PLA instead of LDPE, drop these speeds by about 20–30%. PLA has a narrower processing window and crystallizes slower, so you need more contact time with the cooling roll.
Watch out for: If you push speed too high for the coating weight, the PE doesn’t fully solidify before the web hits the next roller. You’ll get “blocking” — the coated surface sticks to the back side of the paper on the rewind roll. Once blocking starts, you’re basically unrolling a stuck-together log. Stop, cool everything down, and restart at a lower speed.
Six Checks Before You Feed That First Roll
Before you feed that expensive cup stock into the line, run through these checks. Each one comes from an actual problem that cost someone half a day of downtime:
-
Web path confirmed: Paper travels unwind → EPC → corona treater (optional, but recommended for adhesion) → nip → cooling roll → edge trim → rewind. Skipped the corona treater? Test adhesion first. Some cup stock bonds fine without it; some doesn’t.
-
Die lip gap uniform: Feeler gauge at three points (left, center, right). Variation should be under 0.03mm.
-
Cooling roll water circulating: Check flow meter and temperature. If the chiller hasn’t been running, give it 15 minutes to stabilize before you start.
-
Edge trim aligned: The trim knives should cut about 5–10mm from the coated edge on both sides. Too close, and you risk ragged edges. Too far, and you waste material.
-
Automatic splicer ready: Paper rolls are heavy. If your line has a turret unwinder with auto-splicing, test the splice cycle with the machine stopped. A misfired splice at 200 m/min creates a mess you don’t want to clean up.
-
Operator station clear: Seems obvious, but I’ve watched someone trip over a pallet during startup and lose web tension for 50 meters of production.
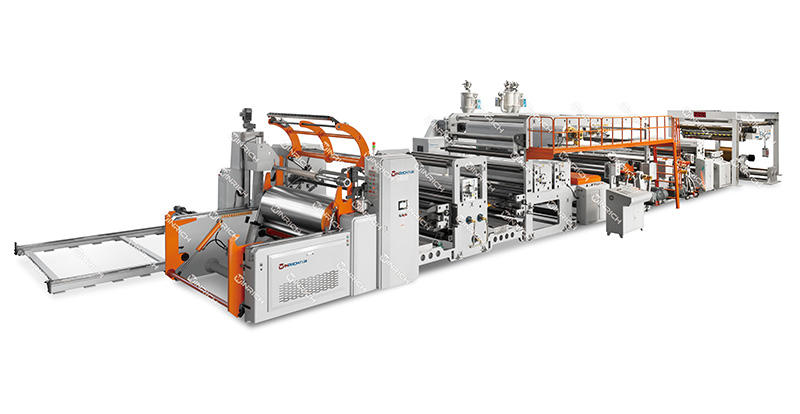
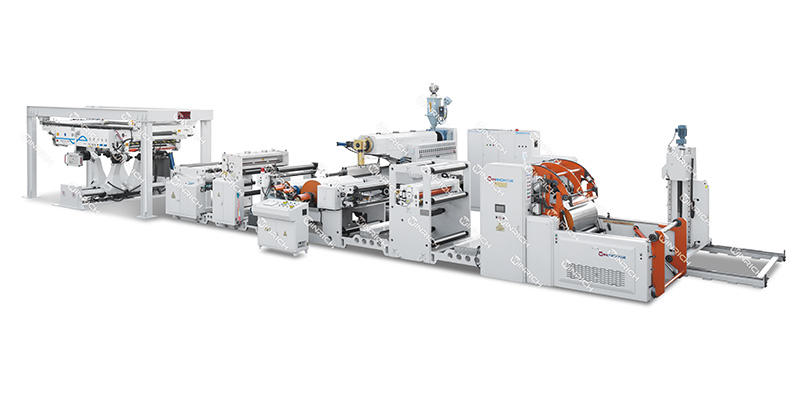
A Machine Built for Cup Stock — the WSFM1100-2000C
Running one-sided coating on paper cup stock is different from double-sided lamination used in aseptic packaging. With single side equipment, you’re applying the barrier exactly where it’s needed—the inside of the cup—while leaving the outside printable and uncoated. That’s precisely what cup converters need.
The WSFM1100-2000C Single Side Full Automatic High Speed Extrusion Laminating Machine from Yilian Machine is built for exactly this application. It features a shaftless unwinder with an automatic splicing system that keeps paper flowing even during roll changes, so you don’t lose production every 30 minutes when a roll runs out. The hydraulic compounding system maintains even coating distribution across the entire web width, which is critical when you’re running 200+ gsm cup stock that tends to warp under uneven pressure. And the PLC man-machine interface centralizes all your temperature, speed, and tension controls on a single touch panel—no hunting for analog dials or guessing where a setting is.
What I appreciate about this particular model is the attention to the operator experience. The shaftless unwinder design eliminates the need to lift heavy paper rolls onto a shaft—you simply roll the paper core into position, and the chucks engage automatically. On a busy production floor, that’s not a luxury; it’s a back-saving necessity.
Your Team’s Most Frequent Head-Scratchers — Solved
Q: Can I run PLA on the same line as LDPE?
A: Yes, but you’ll need to adjust temperature zones. PLA extrudes at 170–200°C, not 280–310°C like LDPE. You’ll also need a different cooling roll temperature—PLA requires warmer cooling (30–40°C) to avoid excessive crystallization that makes the coating brittle. The WSFM1100-2000C can handle both, but you’ll want to do a full purge between resin changes.
Q: Why is my coated paper curling toward the coated side?
A: That’s normal. The PE layer shrinks slightly as it cools, creating tension that pulls the paper toward the coated side. In a finished cup, the curl doesn’t matter—the forming process overrides it. But if the curl is severe enough to cause web handling issues during slitting or printing, reduce your cooling roll temperature by 3–5°C. Slower cooling gives the PE time to relax before it fully solidifies.
Q: What’s the lightest paper I can run at high speed?
A: 180 gsm is about the lower limit for stable web handling at speeds above 200 m/min. Lighter stock tends to flutter in the unsupported span between the unwind and the nip, which leads to edge wrinkles. If you need to coat 150–170 gsm paper, consider adding a web stabilizer or reducing line speed to 120–150 m/min.
Q: How often should I pull the die for cleaning?
A: Every 24 hours of runtime for LDPE, or whenever you see streaks, gels, or carbon specks in the coating. Some operators run a low-melt-index purge resin through at the end of each shift. It adds ten minutes to cleanup but saves you from a mid-run die tear-down.
Making These Numbers Work for Your Specific Line
Every line has its own personality. The numbers in this guide—280–310°C melt temperature, 40–60 N/mm nip pressure, 15–25°C cooling roll—are starting points, not laws of physics. Paper cup stock from different mills behaves differently. A batch with 6% moisture runs differently from one with 8%. Coating weight targets shift depending on whether you’re making 8oz coffee cups or 32oz cold drink cups.
The best approach? Keep a setup log. Record temperature profiles, nip pressure, line speed, and coating weight for every successful run. After a few months, you’ll have a chart that tells you exactly where to start for each material combination. That’s when an Extrusion Coating Lamination Machine stops being a challenge and starts being a competitive advantage.
【Request a quote from Yilian Machine for the WSFM1100-2000C Single Side Full Automatic High Speed Extrusion Laminating Machine】
Tell them your target paper weight range, desired coating weight (gsm), and average monthly throughput in tons. Their engineering team will recommend a configuration tailored to cup stock production.